Setting up passwordless SSH is a simple two step process. This guide will walk you through doing it with OpenSSH and PuTTY. Although PuTTY is available for UNIX like operating systems, I am going to assume you are using it on a Windows computer.
Here are the two steps:
- Create a private key on the machine you will be logging in from.
- Add the private key’s corresponding public key to the destination machine account’s authorized keys.
That is it.
Generate a Private Key
OpenSSH
Since I use a Debian desktop, this is what I use.
From the source machine, login as the user you will be using to access the remote machine. Then use ssh-keygen to generate the private key. Press enter at the prompts to accept the defaults. The following example creates a 4096 bit RSA key:
tyler@desktop:~$ ssh-keygen -t rsa -N "" -b 4096
Generating public/private rsa key pair.
Enter file in which to save the key (/home/tyler/.ssh/id_rsa):
Your identification has been saved in /home/tyler/.ssh/id_rsa.
Your public key has been saved in /home/tyler/.ssh/id_rsa.pub.
The key fingerprint is:
f5:b2:4b:e0:5e:9f:3b:48:3d:11:ed:44:01:8d:de:60 tyler@desktop
The key's randomart image is:
+---[RSA 4096]----+
|            .*o. |
|            E +  |
|          .o *   |
|         . .o o  |
|        S ....   |
|       . ..oo    |
|        ..+. .   |
|       . o.o..   |
|        . . +o   |
+-----------------+
tyler@desktop:~$
PuTTY
If you don’t already have it, download PuTTYgen. No installation is required, just run the executable.
Optionally, enter a pass phrase to encrypt your key with. Click the Generate button to create a new private key.
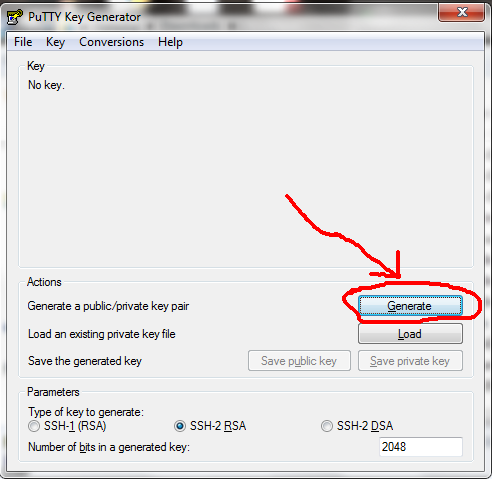
Click the Generate button.
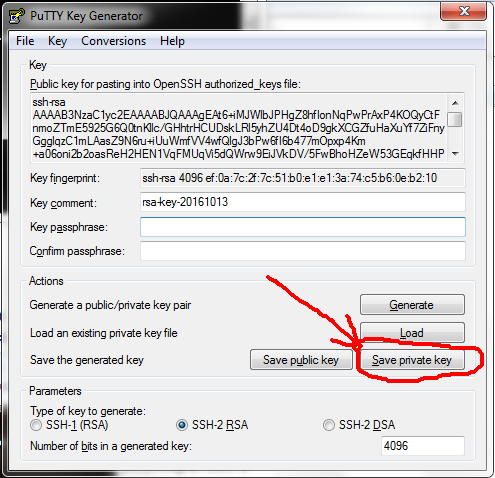
Click Save private key to save the newly generated key. Make note of the file name and where you save it. Leave this window open.
Add Public Key to Destination’s Authorized Keys
Now you need to add your public key to the destination host and user’s authorized keys file.
OpenSSH
This is easy with OpenSSH. Just use the command ssh-copy-id:
tyler@desktop:~$ ssh-copy-id user@destination_host
/usr/bin/ssh-copy-id: INFO: attempting to log in with the new key(s), to filter out any that are already installed
/usr/bin/ssh-copy-id: INFO: 1 key(s) remain to be installed -- if you are prompted now it is to install the new keys
user@destination_hosts's password:

Number of key(s) added: 1

Now try logging into the machine, with:   "ssh 'user@destination_host'"
and check to make sure that only the key(s) you wanted were added.
PuTTY
First, you need to make sure the ~/.ssh directory of the user you are logging in as exists on the destination host and has the correct permissions. Login to the destination host and run the following command. Stay logged in when you are finished.
user@destination_host:~$ sh -c '[ -d ~/.ssh ] || mkdir ~/.ssh && chmod 700 ~/.ssh'sh -c runs the command following it with a Bourne compatible shell. The single quotes around the command prevent the shell you are using from interpreting the special characters, ensuring that sh does. [ -d ~/.ssh ] is a conditional expression that tests to see if there is a directory in your home directory called .ssh. The || instructs sh to execute the command to the right of it if the conditional expression or command to the left of it fails. In this case, we want to create the ~./ssh directory if it does not exist. && instructs the shell to execute the command to the right of it only if the command or conditional expression on its left succeeds. Finally, chmod 700 ~/.ssh sets the file permissions of the directory to what the OpenSSH documentation recommends.
Next, you need to append your public key to the authorized keys file (~/.ssh/authorized_keys) of the user you are logging in as on the destination host. Copy the public key shown on the top of the PuTTYgen window to your clipboard.
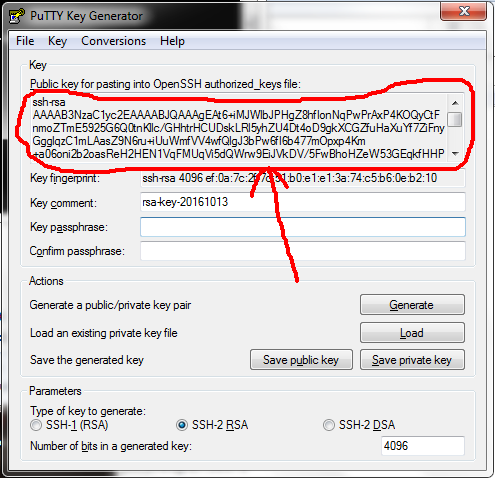
Copy this to your clipboard.
Go back to your PuTTY window, and run this command on the destination host, replacing the highlighted text with the public key from your PuTTYgen window:
tyler@desktop:~$ sh -c 'cat >> ~./ssh/authorized_keys << EOF
> ssh-rsa AAAAB3NzaC1yc2EAAAADAQABAAACAQDQ5AAbIPHeMumJLZz3VXWKSTG0kfKyYT8HaSv1MjIPyWCzCjAF0GuAqJ16U58pLdOJY8aLOU0GA1KrH7CNuV6TrSAyD8YiDYIFt3367DBksGOQp7kXXjw0zNtfQENGvGd1MFzaQe0UALWE4jxhVuT2N7bufLNgLnroFPUhS5wP1zjRL/eKdgkPiyUrEojzrybxovSzmVQEYzivQtxjfRjKFtnQQUIGMHQUhdAc2WJT4DIbQN9nZBEsacIPORPJLU7dwpKDJMOtKaTtH32aIZNbqI77MDF6/cbsV3fEbvNtOgeiEZNH+BL05KkevVyz6599zARCxkT8NQYwV1f5nRrXehLwmdwgFEzHSTSJDcYy8PH8pl9dgI6p8MXM2m2ao3MNoMystG/WKXV9a+O6MG9ZdToGCmOT32UIAQAY94GK35Pdl464AkdXUBXu4WmmY/PGQj2guejDx1Qc9XriUkBytqlyF1BvY897rdWLpQKC9mru8NTSt40xubVMgL4A5z7pU4Xb+oZcuaSXL/1TMJaE+kjNKSePx/AEuPp75eYZR3K/XGecWUlsMdynvWfN3adFkbAEqH1AX/sr2aNUY4PO42SbDVIeSIrC+fUf7jYQqF5efKcinBHXM6JVFB1Z2huM7w58TfCJmJDbTXzag5IHVhRktubFIVHaS+8jxXCM+Q== tyler@desktop
> EOF'
If anyone but the owning user can write to the authorized keys file, SSH will ignore it and prompt for a password. Make sure nobody but the owning user can write to the authorized_keys file:
chmod og-w perm ~./ssh/authorized_keysLogin
Login to the destination host to test your configuration.
OpenSSH
tyler@desktop:~$ ssh user@destination_hostPuTTY
Open the private key file you saved earlier by expanding the Connection tree, then SSH, then clicking on Auth. Click the Browse button and open your private key file.
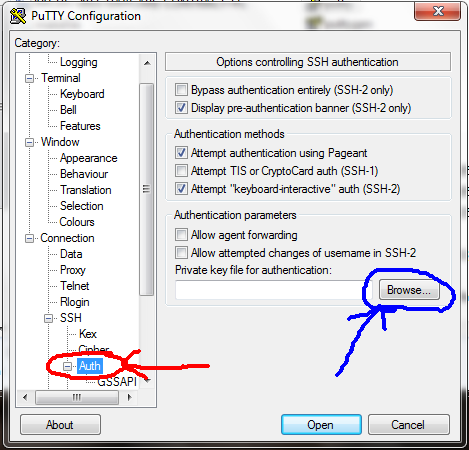
Click the Browse button and select the private key file.
Now go back to Session and login to the destination host as you normally would. Make sure to save the session so you don’t have to open your private key file every time you use it login.
Appliances
Some appliances such as NAS devices, network switches and routers have a command line interface accessible through SSH. You can usually setup passwordless logins on these devices. The steps are the same as setting it up on a run of the mill UNIX like operating system. Consult the devices documentation or online help to find out how to add your public key.