Increasing the size of a Disk in VirtualBox can be done with the GUI or the command line. I will cover both methods. Resizing the partitions and filesystems on the virtual machine using the disk is beyond the scope of this guide.
Directly below are quick procedures. If you want a more in depth explanation or screen shots, use one of these links:
Quick Procedures
Using the GUI:
- Shutdown the virtual machine that is using the disk.
- Open the VM VirtualBox Manager (the main window that opens when you launch the GUI)
- Click File
- Select Virtual Media Manager from the menu.
- Select the Hard disks tab.
- Choose the disk you wish to resize from the list.
- Click the Properties button.
- In the Attributes tab, use the slider or text box to specify the new size.
- Click Apply.
Using the command line:
First, shutdown the virtual machine hat is using the disk.
Replace MB in the examples with how big, in megabytes, you wish to resize the disk to.
Linux/Unix:
$ vboxmanage modifymedium disk /virtual/disk/file --resize MBWindows:
C:\> cd C:\Program Files\Oracle\VirtualBox
C:\Program Files\Oracle\VirtualBox>VBoxManage modifymedium disk C:\path\to\file --resize MB
If you are running an older version and one of the commands doesn’t work, try this:
vboxmanage modifyhd /path/to/disk --resize MBReal Example:
$ vboxmanage modifymedium disk \
  "/home/tyler/VirtualBox VMs/CentOS 7 ext4 Clone/CentOS 7 ext4 Clone.vdi" \
  --resize 30000
0%...10%...20%...30%...40%...50%...60%...70%...80%...90%...100%
GUI
First Open the VirtualBox Manager. It is the window that pops up when you first launch VirtualBox. Now select Virtual Media Manager from the file menu:
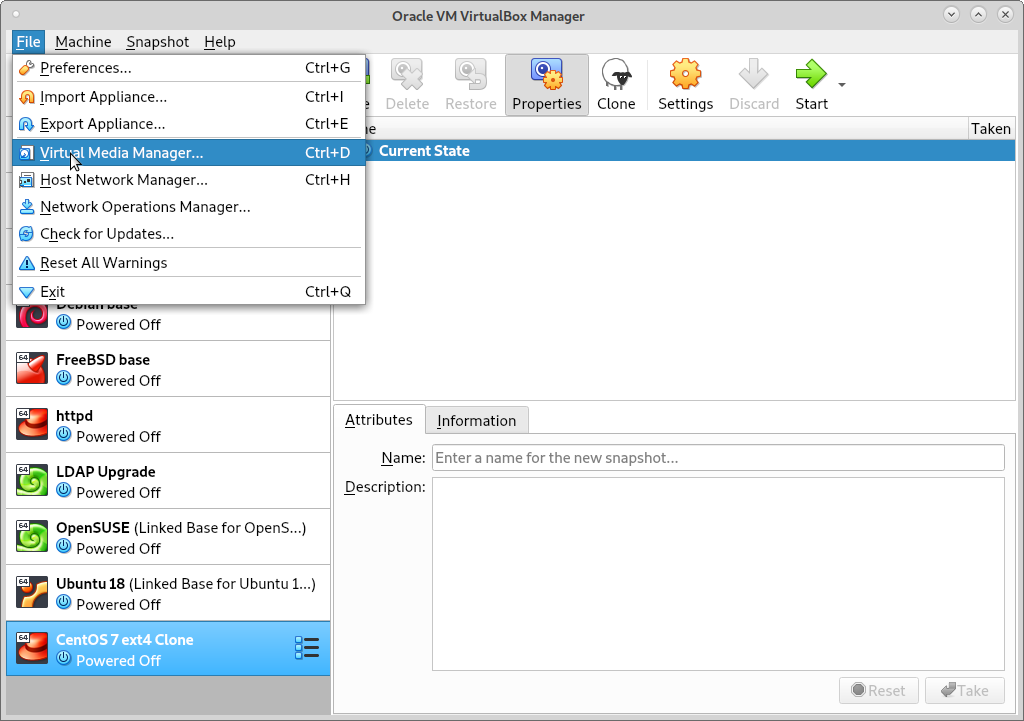
Select Virtual Media Manager
On the Hard disks tab of the Virtual Media Manager window, click on the disk you wish to resize.
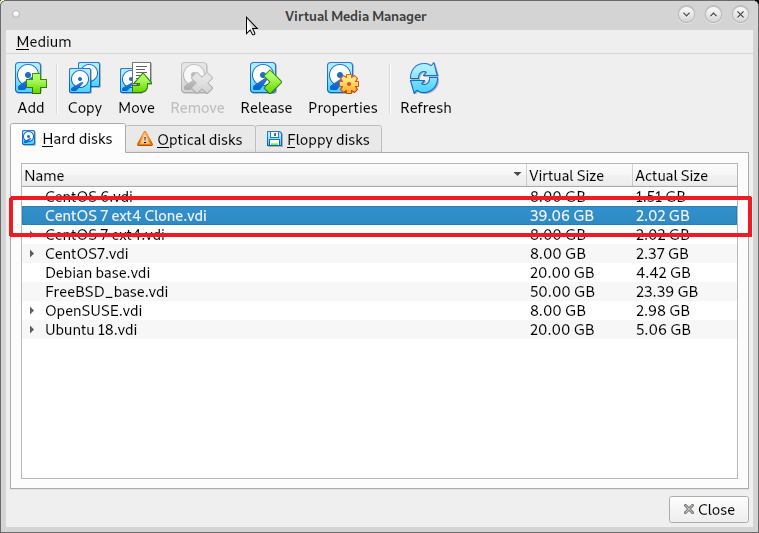
Select the disk you wish to resize.
Once you have selected the disk, click the Properties button.

Click Properties.
Using the slider or box, choose the new disk size.

Use the slider or text box to specify the new size.
Now click Apply.
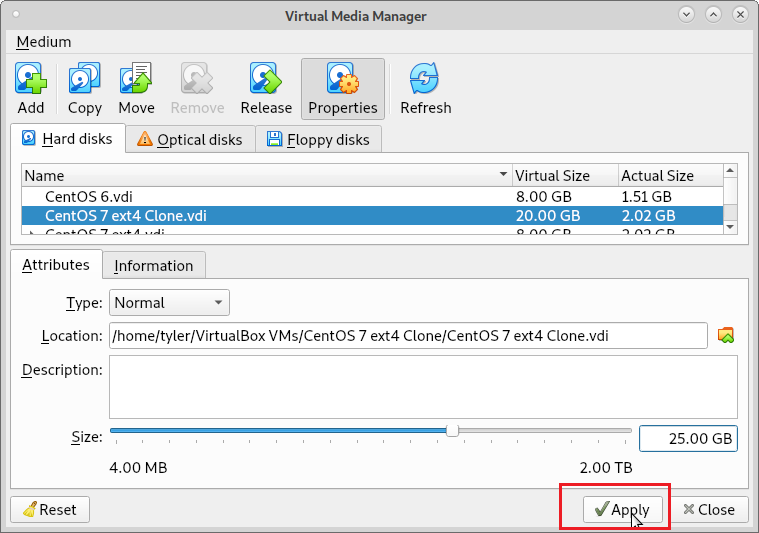
Click apply to make the change.
Command Line
First, shutdown the virtual machine using the disk.
All of the commands should be run as the user you run VirtualBox as. There is no need to use an administrative account. If the command to actually make the modification gives you the following the error, replace modifymedium with modifyhd.
Syntax error: Invalid command 'modifymedium'If you are using Windows, you must be in the VirtualBox installation directory. By default, that is C:\Program Files\Oracle\VirtualBox. If you are using another operating system, ignore this step.
C:\> cd C:\Program Files\Oracle\VirtualBoxThe first thing you need to do is determine the file path or UUID of the disk file. Use vboxmanage list hdds to do this:
$ vboxmanage list hdds
UUID:           ec525246-7e0c-406c-8957-3ad5ad7cbe3a
Parent UUID:    base
State:          created
Type:           normal (base)
Location:       /home/tyler/VirtualBox VMs/CentOS 7 ext4 Clone/CentOS 7 ext4 Clone.vdi
Storage format: VDI
Capacity:       25000 MBytes
Encryption:     disabled
You can use either the UUID or the path of the disk file to specify the disk you are resizing. I will show examples of both.
Using the UUID:
$ vboxmanage modifymedium disk ec525246-7e0c-406c-8957-3ad5ad7cbe3a --resize 35000
0%...10%...20%...30%...40%...50%...60%...70%...80%...90%...100%
Using the file path:
$ vboxmanage modifymedium disk \
"/home/tyler/VirtualBox VMs/CentOS 7 ext4 Clone/CentOS 7 ext4 Clone.vdi" \
--resize 40000
0%...10%...20%...30%...40%...50%...60%...70%...80%...90%...100%
If you aren’t familiar with the Linux command line environment, a \ at the end of a line means you wish to continue the command on the next line. The command won’t run until you press enter again.
I recommend always surrounding the file name with “”. If it contains a space or a character that has a meaning to the shell, it indicates to the shell you want it to forego the action it would normally take and treat it as an option to your command.